A luxury bathroom mirror isn’t just functional, it’s a design anchor that sets the tone for your entire space. Whether you’re planning a full remodel or upgrading key finishes, the right mirror elevates everything from lighting to perceived square footage. In 2026, luxury mirrors blend cutting-edge tech with timeless materials, offering features that go beyond reflection. This guide walks through what defines luxury in mirrors, which styles deliver the best impact, and how to install them correctly so they look professionally done.
Table of Contents
ToggleKey Takeaways
- A luxury bathroom mirror combines thicker glass (1/4″ to 3/8″), copper-free silver backing, and solid frames to resist corrosion and warping—the hallmarks of quality construction over builder-grade options.
- LED-lit and smart luxury mirrors with adjustable color temperature (2700K–5000K), anti-fog heating, and voice control can cost $400–$1,500 and require proper electrical installation by a licensed electrician.
- Mirror proportions should be 4″–8″ narrower than your vanity width, with the bottom edge positioned 4″–6″ above the countertop, and proper mounting into studs or heavy-duty fasteners for safety.
- Frameless and minimalist luxury bathroom mirror styles require perfectly flat walls and thicker glass (3/8″ recommended) to prevent visible imperfections and warping.
- Premium features like anti-fog heating ($100–$300), magnifying insets, tunable white LEDs, and custom framing in materials like blackened steel or walnut elevate visual impact and functionality.
- Heavy luxury mirrors weighing 30+ pounds must anchor into wall studs or toggle bolts; use level/laser tools during installation and allow mirror adhesive 24–48 hours to cure for a professional finish.
What Makes a Bathroom Mirror ‘Luxury’?
Luxury starts with materials and construction quality. Instead of thin plate glass on particleboard backing, high-end mirrors use thicker glass (1/4″ to 3/8″), copper-free silver backing for corrosion resistance in humid environments, and solid wood, metal, or composite frames that won’t warp.
The finish matters just as much. Look for beveled or polished edges, hand-applied patinas on metal frames, or seamless frameless mounting hardware that’s hidden behind the glass. Cheap mirrors show visible clips or rough-cut edges.
Premium features separate luxury mirrors from builder-grade options: integrated LED lighting with adjustable color temperature (2700K warm to 5000K daylight), defogging elements, touch or motion sensors, and even smart connectivity for voice control or preset lighting scenes.
Finally, luxury mirrors are typically custom-sized or available in non-standard dimensions. Off-the-shelf mirrors come in predictable sizes (24″×36″, 30″×40″): luxury options offer incremental sizing to fit your exact vanity width or ceiling height, eliminating awkward gaps or proportions.
Weight is a telltale sign, too. A quality 36″×48″ framed mirror will weigh 30–50 pounds due to thicker glass and solid frame materials. If it feels light, it’s likely thin glass with hollow framing.
Top Luxury Bathroom Mirror Styles to Elevate Your Design
LED-Lit and Smart Mirrors
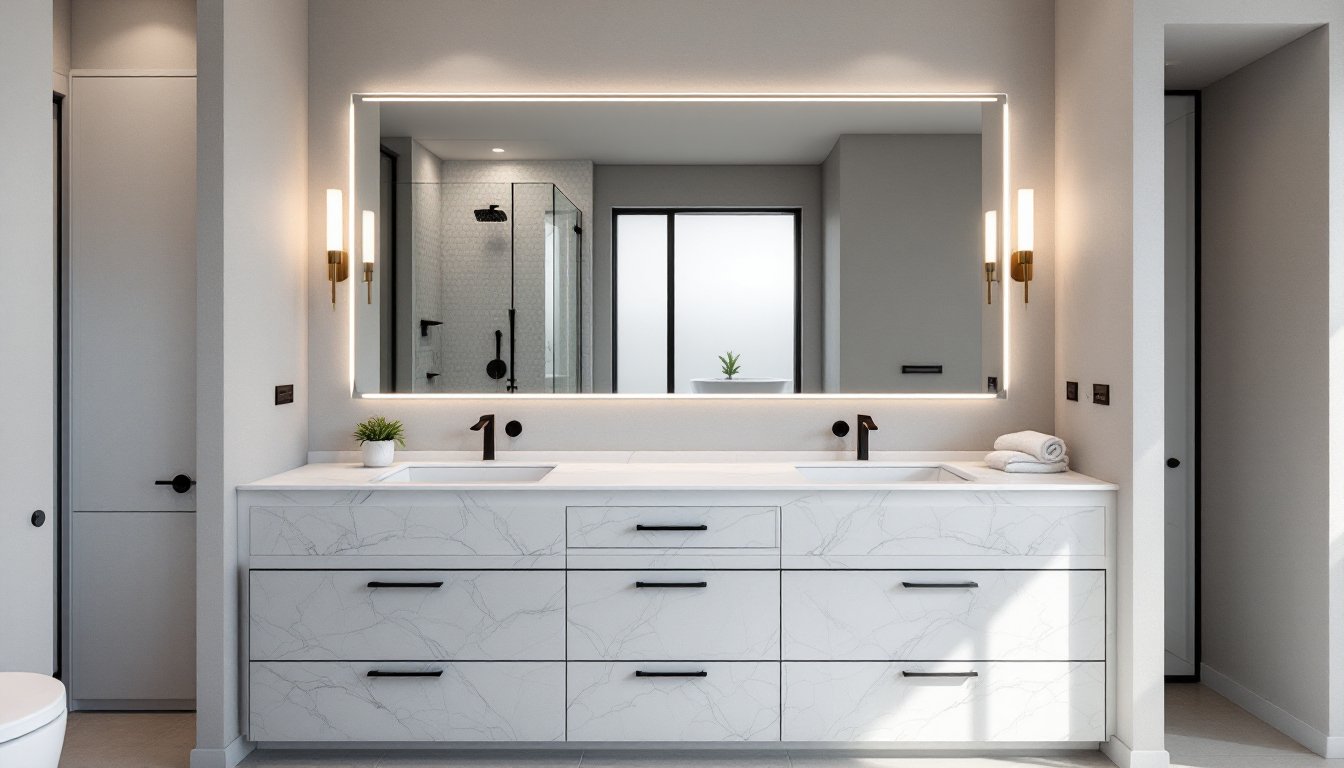
Built-in LED lighting has become the hallmark of luxury interior design in bathrooms. These mirrors feature edge-lit or backlit LED strips embedded in the frame or behind the glass, casting even, shadow-free light across your face, critical for grooming tasks.
Most luxury LED mirrors offer dual color temperature settings: warm white (2700K–3000K) for evening relaxation and cool white (4000K–5000K) for makeup application or shaving. Higher-end models include dimming controls and memory presets.
Smart mirrors take it further with Bluetooth speakers, anti-fog heating pads (typically 12V low-voltage systems that warm the glass), and touchless controls. Some integrate with Alexa or Google Home for voice-activated lighting. Expect to pay $400–$1,500 for quality smart mirrors, depending on size and feature set.
Installation requires access to 120V electrical and often a dedicated circuit if the mirror includes heating elements. If your bathroom lacks an outlet near the mirror location, you’ll need to run new wiring, this may require a permit and a licensed electrician depending on local codes.
Frameless and Minimalist Designs
Frameless mirrors deliver a clean, modern aesthetic that works in contemporary, transitional, and even traditional spaces when paired with the right hardware. The glass is the entire focal point, with polished or beveled edges and concealed mounting.
Luxury frameless mirrors use thicker glass (3/8″ is ideal) to prevent warping and flexing, especially in larger sizes. They’re mounted with hidden J-channels, French cleats, or adhesive-plus-clip systems that distribute weight evenly across studs.
For a high-end look, consider wall-to-wall or floor-to-ceiling installations. A frameless mirror spanning the full width of a double vanity (60″–72″) creates continuity and makes the room feel larger. Just ensure your wall is flat and plumb: frameless mirrors show every imperfection in the substrate.
Another minimalist option: floating mirrors with standoff hardware. Polished stainless steel or brass standoffs hold the mirror 1/2″ to 1″ off the wall, casting a subtle shadow that adds depth. This style pairs well with vessel sinks and wall-mounted faucets.
When working with minimalist mirror styles, interior designers often recommend balancing simplicity with rich textures elsewhere, like natural stone, wood vanities, or textured tile, to avoid a cold or sterile feel, as noted in upscale design projects.
Choosing the Right Size and Placement for Maximum Impact
Mirror size should relate directly to vanity width. A general rule: the mirror should be 4″–8″ narrower than the vanity to leave breathing room on each side. For a 48″ single vanity, a 40″–44″ wide mirror is proportional. For double vanities (60″–72″), either use one large mirror spanning most of the width or two separate mirrors (each 24″–30″ wide) centered over each sink.
Height matters, too. Standard practice places the bottom edge of the mirror 4″–6″ above the countertop or backsplash. Vertical height depends on users: a 30″–36″ tall mirror works for most adults, but if you have tall household members, go with 40″–48″ to avoid cutting off heads.
For maximum impact, consider a floor-to-ceiling mirror on one wall. This works best in larger bathrooms (80+ square feet) and visually doubles the space. Be mindful of lighting: a tall mirror will reflect overhead fixtures, so plan your chandelier or pendant placement accordingly.
When placing sconces, mount them 60″–65″ above the finished floor and 28″–36″ apart (center to center) to flank the mirror symmetrically. If the mirror has integrated lighting, you can skip sconces altogether, but many designers layer both for ambient and task lighting flexibility.
Avoid common mistakes: Don’t hang a mirror so high that shorter users see only their foreheads, and never place it where it directly reflects a toilet or cluttered shower. Mirrors amplify what they reflect, including messes.
Premium Features Worth the Investment
Anti-fog heating is a game-changer in humid bathrooms. A thin heating pad (usually 12V DC) adheres to the back of the mirror and warms the glass just enough to prevent condensation after showers. Most systems draw 15–30 watts and are hardwired into the same circuit as the mirror lighting. Cost: $100–$300 for aftermarket kits, or bundled in smart mirrors.
Magnification insets are standard in luxury hotel bathrooms and increasingly common in residential projects. A 3X or 5X magnifying section (usually 8″–12″ diameter) is built into one corner of the main mirror, ideal for close-up grooming. Ensure it’s positioned at eye level for the primary user.
Color-changing LEDs (RGB or tunable white) let users adjust lighting to match time of day or mood. Tunable white (2700K–6500K) is more practical for bathrooms than full RGB, which tends to skew color accuracy for makeup.
Hidden storage or medicine cabinets behind mirrors combine function and aesthetics. Luxury versions use soft-close hinges, adjustable glass shelves, and integrated interior lighting. Recessed models require cutting into the wall cavity between studs: surface-mount versions add 4″–6″ of depth but work on any wall.
Finally, custom framing in materials like blackened steel, unlacquered brass, or solid walnut elevates a standard mirror into a statement piece. Many curated mirror collections offer frames in artisan finishes that age beautifully and complement high-end fixtures.
Installation Tips for Your Luxury Bathroom Mirror
Start by locating studs with a stud finder. Heavy mirrors (30+ pounds) must anchor into studs or use heavy-duty toggle bolts rated for the weight. Mark stud centers and plan your mounting hardware accordingly, most luxury mirrors include French cleats, D-rings, or proprietary brackets.
For frameless or large mirrors, use a combination of mirror adhesive (like Loctite PL 530 Mirror Adhesive) and mechanical fasteners. Apply adhesive in vertical beads spaced 4″–6″ apart on the back of the mirror, then press into place. Use painter’s tape to hold it while the adhesive cures (typically 24–48 hours). Add clips or J-channel at top and bottom for safety.
Level and plumb are non-negotiable. Use a 48″ level (or laser level for large installations) to mark your layout lines. A mirror that’s even 1/8″ off over 4 feet is visibly crooked.
If your mirror requires electrical connection, turn off power at the breaker before starting. Most LED mirrors come with a 120V plug or hardwire pigtail. If hardwiring, connect line, neutral, and ground per NEC Article 410 (Luminaires). Use a junction box rated for the load, and consider installing a wall switch if the mirror doesn’t have an onboard switch. This work may require a permit and inspection, check your local building department.
Safety note: Always wear gloves when handling mirrors. Sharp edges can cause deep cuts, and broken glass is a serious hazard. Have a helper for mirrors over 30 pounds, they’re awkward and unforgiving if dropped.
For drywall-only walls (no studs at your desired location), use heavy-duty toggle bolts rated for 50+ pounds each. Install at least two per mirror, positioned near the top to carry the weight. Avoid relying solely on adhesive in these scenarios.
Once installed, clean the mirror with a microfiber cloth and glass cleaner (avoid ammonia-based products on mirrors with special coatings). Step back and check reflections from multiple angles, you may need to adjust light fixtures if you see glare or hot spots.